
Mailchimp isn’t just for marketing—it can support sales teams by automating outreach, segmenting leads, and tracking engagement to prioritize follow-ups.
But while it offers powerful tools, its true value comes from syncing with your CRM to keep data aligned and personalize communication at scale.
The takeaway? B2B sales teams can drive more conversions by using Mailchimp for targeted, automated engagement that complements human-led selling.
MailChimp is a beloved staple in the email marketing world. Almost everyone has heard of the platform, and if you communicate with customers for a living, there’s a good chance that you’ve used MailChimp to send out email newsletters and marketing drip campaigns.
However, MailChimp can also be an essential B2B sales tool when used in the right context. With it, you can collect leads on your website, create automated lead nurturing campaigns, and send emails to a list of contacts.
In this article, we’ll cover how to use MailChimp throughout your sales process and walk you through how to set up each specific tactic, including MailChimp automations, forms, PDF links, CRM integration, and campaigns.
🤖 Explore this content with AI:
The first step to adding a prospect to your lead funnel is to collect their contact information. So how can you use MailChimp to do that?
For starters, you can create an embeddable form. To create an embeddable form in MailChimp, go to your Dashboard and click “Lists”:
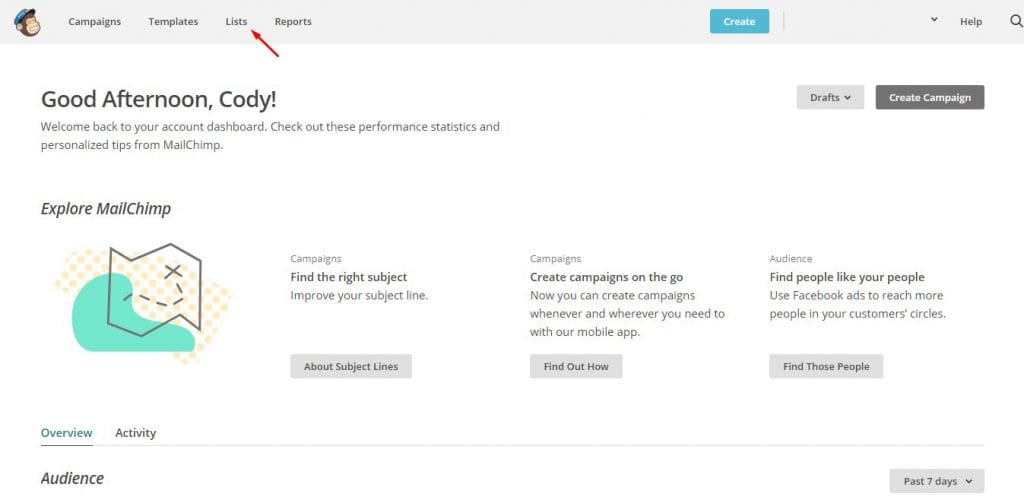
Then, select the list you want to create a form for:
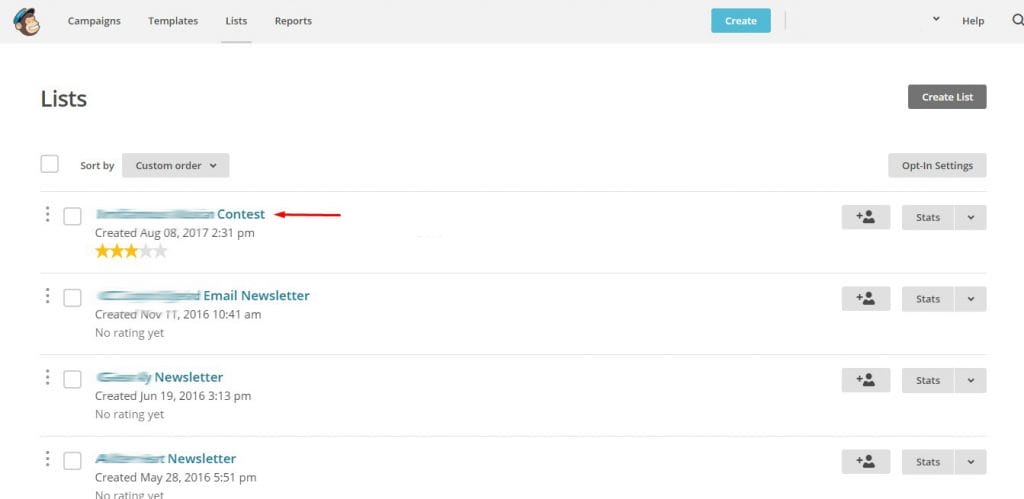
From the list details page, click “Signup forms”:
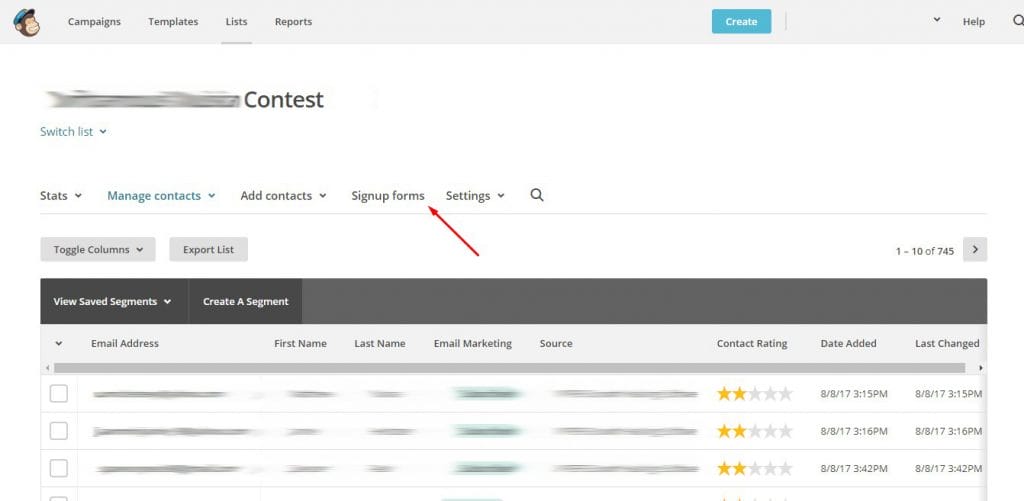
From the Signup forms page, click “Embedded forms”:
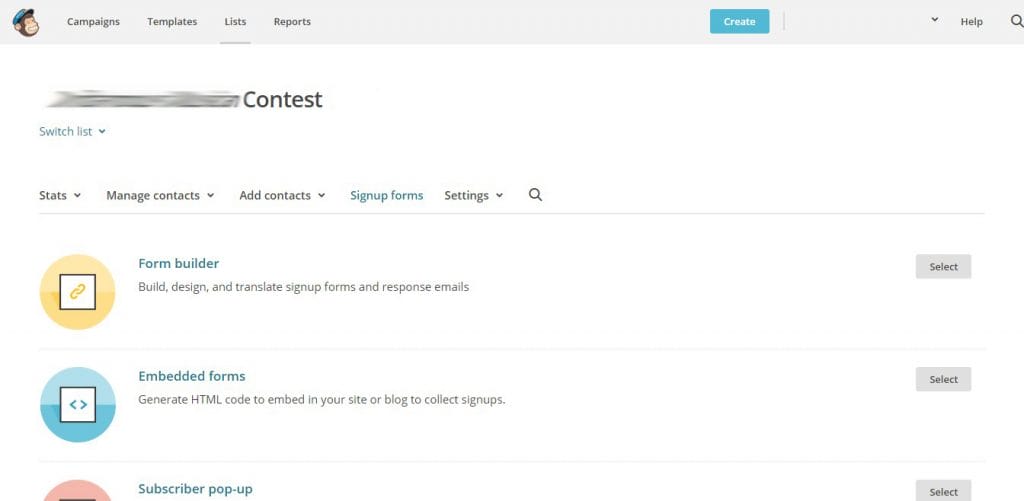
Here, you can set the options for the signup form, then copy and paste the embed code onto your website where you want the form to show up:
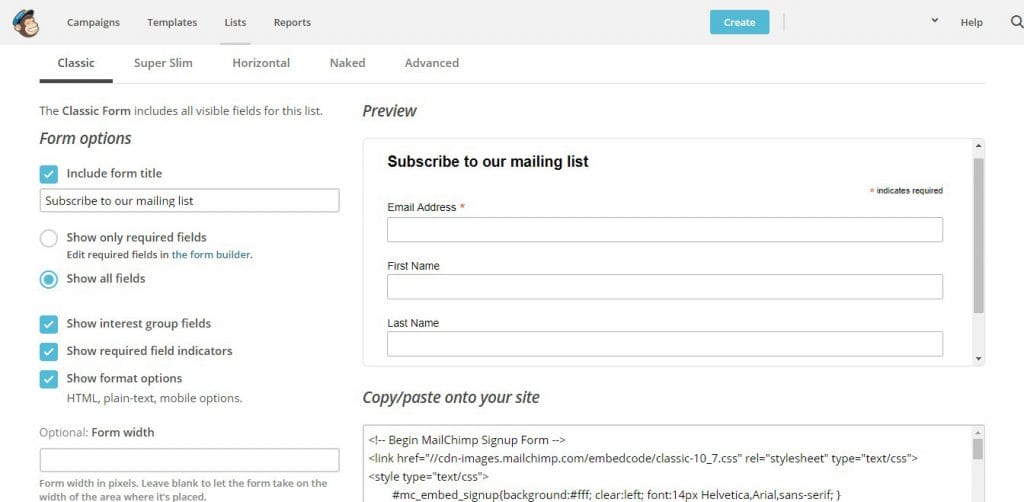
If you want to add additional fields to this list, you can use the form builder to customize this form.
This isn’t the only way to collect leads on your site using MailChimp, though. You can also use a form builder that syncs with MailChimp.
For example, on WordPress you can use Contact Form 7 in combination with the Contact Form 7 MailChimp Extension to create custom forms that will then add people who submit your form to a list you define in MailChimp.
A simpler route in WordPress would be to use the MailChimp for WordPress plugin.
Lastly, you could also use a popup plugin that integrates with MailChimp. For example, you might decide to create a popup form that appears when a visitor has been on a page for a specific amount of time.
When someone fills out this popup form, they will then be automatically added to the MailChimp list you set.
Some options to integrate popup forms on your site include:
Fueled, a mobile app development company, combines popup forms on their website with automated emails from MailChimp to speak to new leads:
“We currently have a pop-up on certain pieces of our blog content, that allow interested readers to opt into our newsletter.
Based on the content they’ve submitted their email from, we can tell what the user is interested in and craft more relevant Mailchimp campaigns that suit them. Since businesses get thousands of emails every day, it’s super important to stay relevant and become a resource that will help them and pique their interest.
It also gives you a chance to demonstrate your expertise. Once we’ve collected the email, we have an automated campaign that is tailored to them, starting with a white paper on a relevant subject.
Following up, we try to engage them with more content from our blog that we think they might find interesting or a questionnaire that they can interact with but also allows us to learn more about their needs.”
Ciara Hautau
Marketing Specialist at Fueled
Nutshell’s email marketing plugs directly into your CRM data, so you can create highly targeted audience segments, track the impact of your emails in real-time, and manage all your communications out of a single tool. Get started for free!

One of the best features of MailChimp is its super easy-to-use email builder. With it, you can build emails by simply dragging and dropping elements where you want them to appear. Combined with a few pre-built templates, this feature allows you to create attractive emails in just a few minutes.
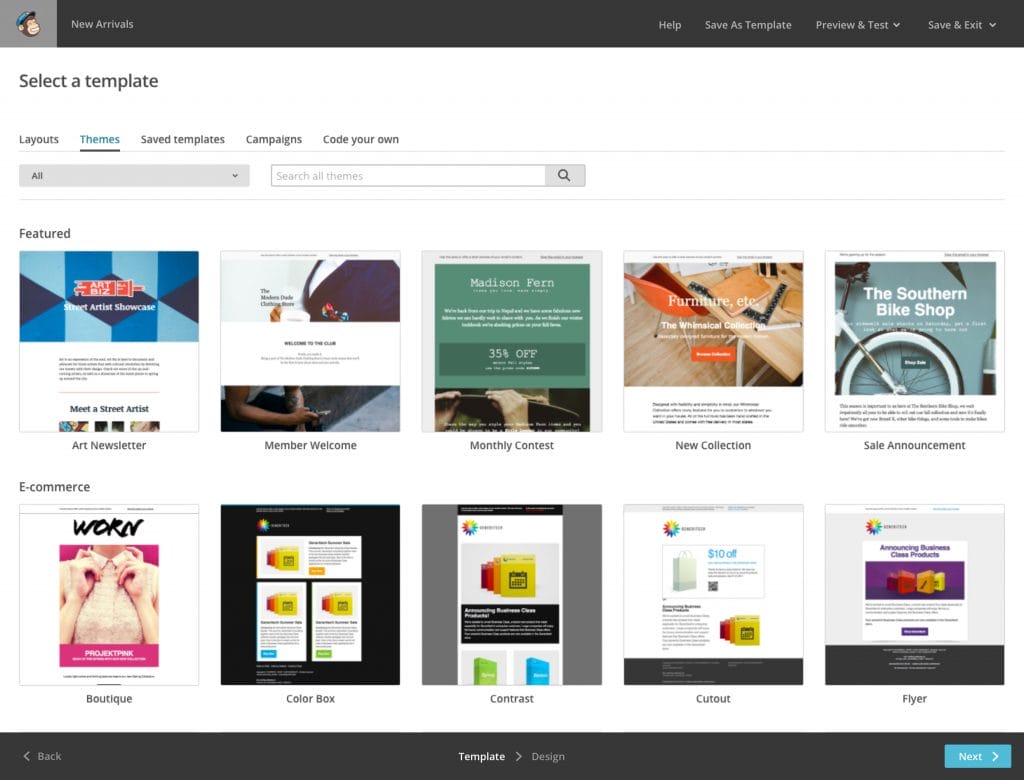
This feature is great for building emails for your monthly newsletter, to promote blog posts or products, or any other type of visual content.
But here’s the thing: It’s clear to the recipient that these emails are sent from an email platform. The email doesn’t look like a “plain” email sent individually to one person from an email client like Gmail.
Thus, these designs won’t always be appropriate for B2B sales. You want your emails to look as if they are being personally sent from you. (For some pro tips on email personalization, read our Ultimate Guide to Writing Cold Emails or our Complete Guide to Much Better Marketing Emails blog posts.)
To work around this problem, you have two options. The first option is to use MailChimp’s Simple Text template:
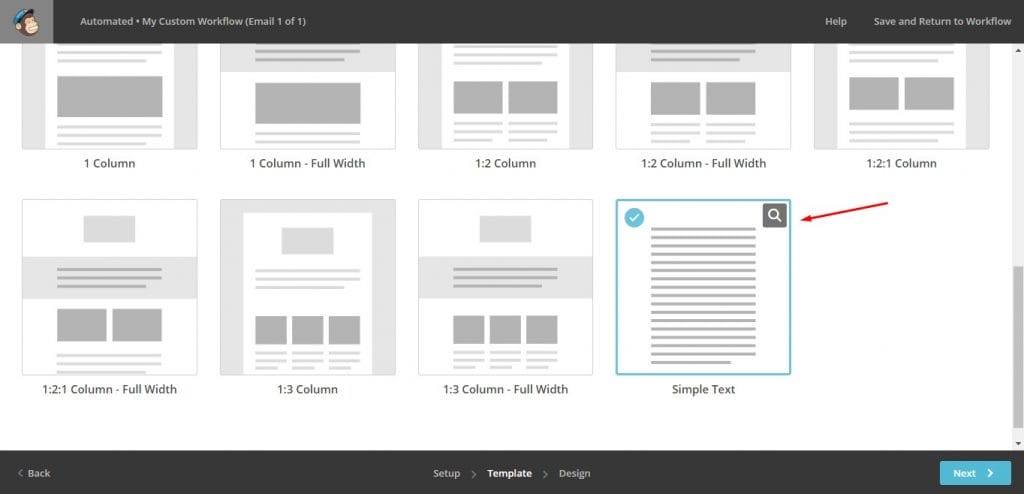
This template will provide a simple text layout that you can customize:
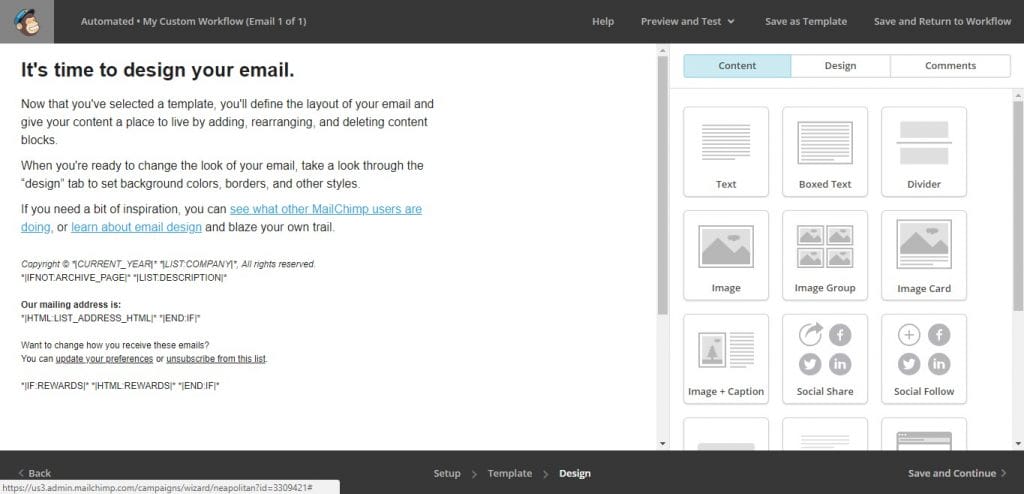
Here’s what it looks like in Gmail with the heading and copyright tags removed:
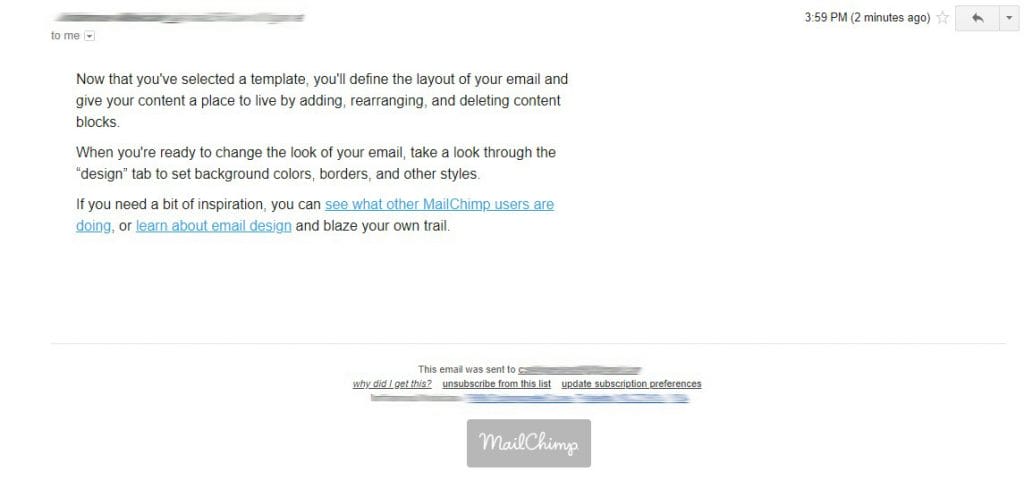
MailChimp will still add your physical address to the bottom of the email. The MailChimp badge will also be there if you are on the free plan. You will need to upgrade to a paid plan to remove it.
The other option is to code your own email. At the “Change template” page, choose “Code your own”:
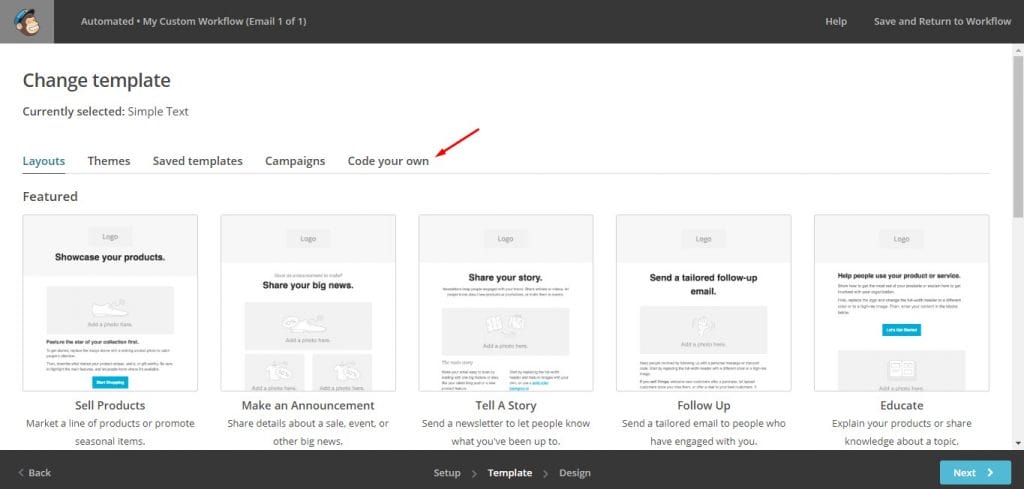
Here, you can paste in your own HTML code:
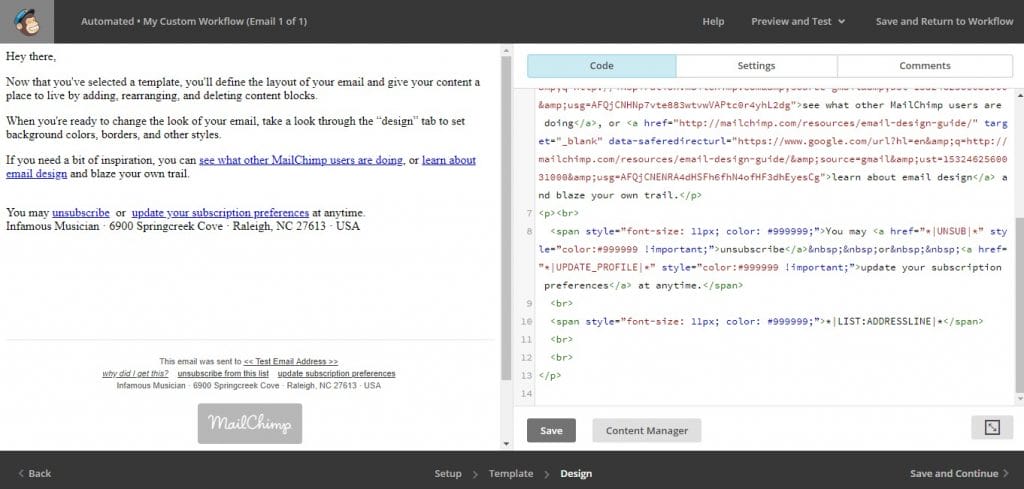
Here’s what the coded email in Gmail looks like:

Again, the address will still be listed at the bottom. Including this is part of MailChimp’s Terms of Use policy in order to adhere to the CAN-SPAM act.
Now that you’ve collected a prospect’s contact information, you can use MailChimp to start nurturing that lead. A great way to do this is to enter them into an automated email campaign.
For example, you may decide to enter trial signups into an educational email sequence that teaches them how to complete certain tasks using your product.
These types of automated email cycles are often referred to as “Drip Campaigns”.
Setting up these drip campaigns can be one of the best ways you can speak to new signups. When we surveyed companies that use MailChimp for B2B sales, the most popular response included using automation:
“I mostly use MailChimp for email campaigns at the top and the middle stages of our sales funnel. I believe emails should be about starting a dialogue.
“I embed micro-surveys directly into MailChimp messages to enable two-way communication and to keep those messages in a conversational style. I also trigger email NPS campaigns to our webinar attendees, which helps me find out what people think about the content I provide, whether they find it valuable and useful, and how I can improve my presentations.”
Marta Kaczmarek
Community and PR Manager at Survicate
To create an automated email, from your MailChimp Campaigns page, click “Create Campaign”:

Then, click “Create an Email”:
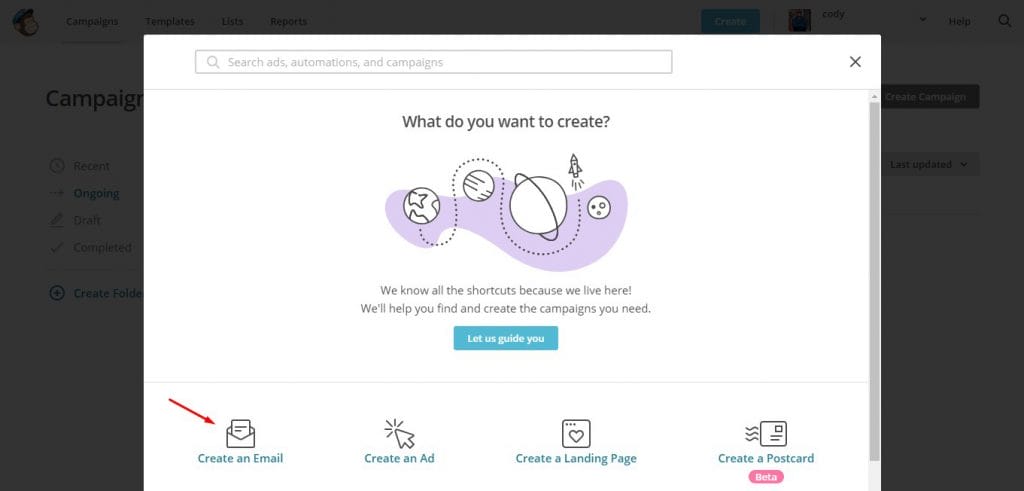
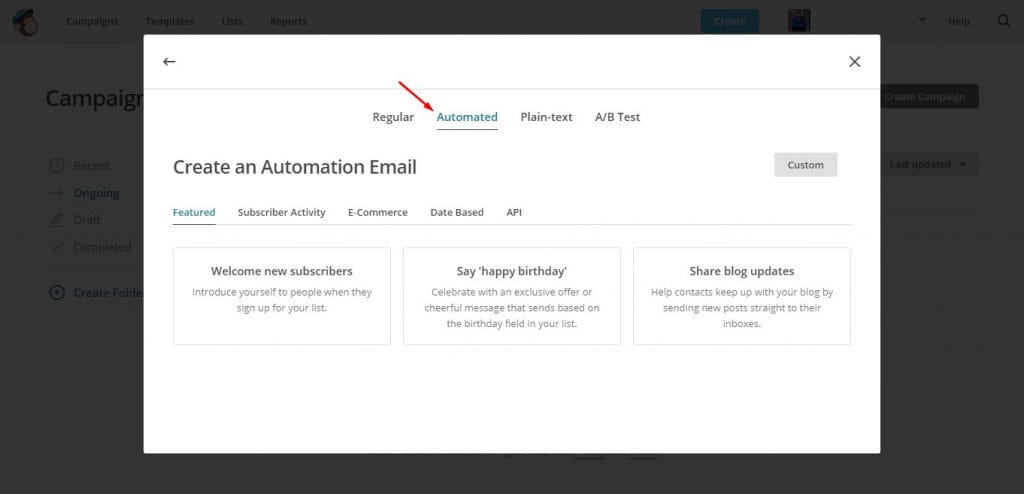
From there, choose “Automated”:
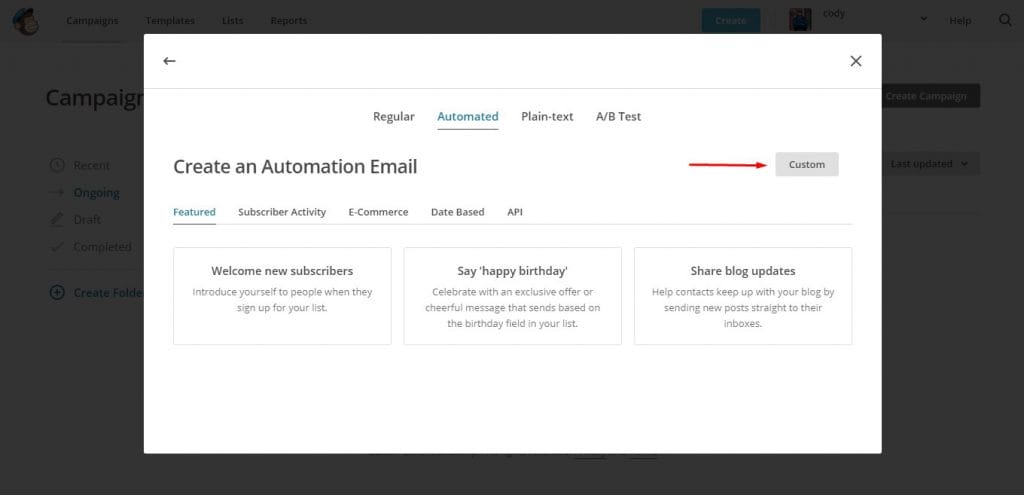
Then, click “Custom”:
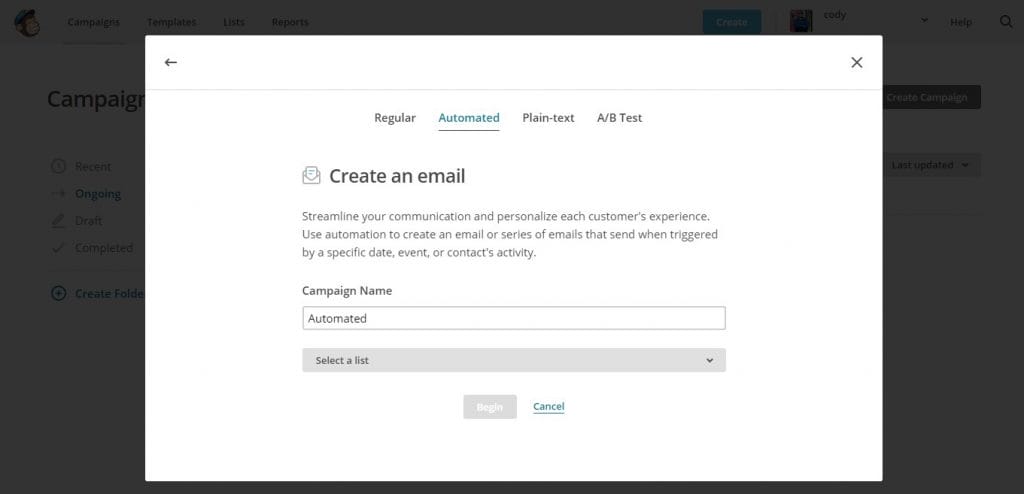
Name your campaign and select a list you want to associate this automation with:
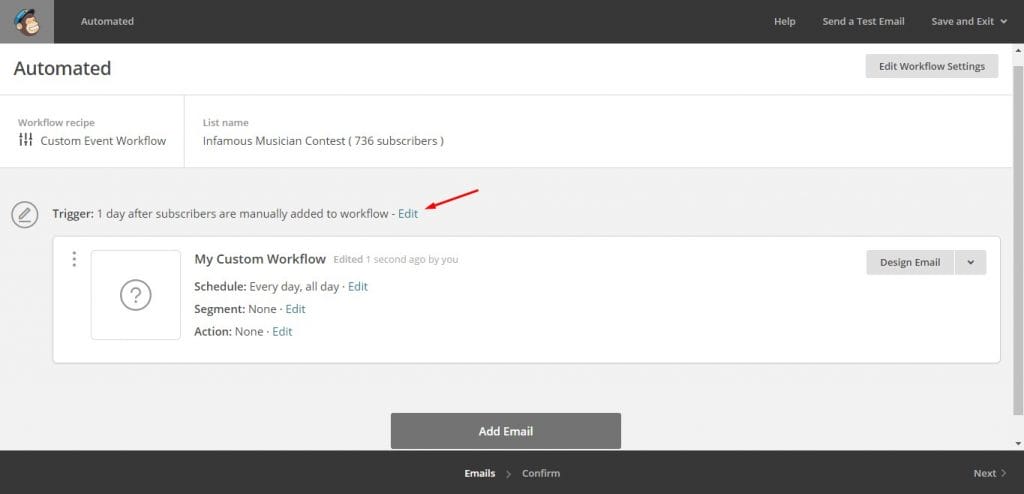
Now, you can use the automation builder. Here, you can add as many emails as you want to this automation and set triggers for each email.
To set the trigger for the first email, click “Edit”:
Then, “Change trigger”:

Here you can set the trigger for the email:
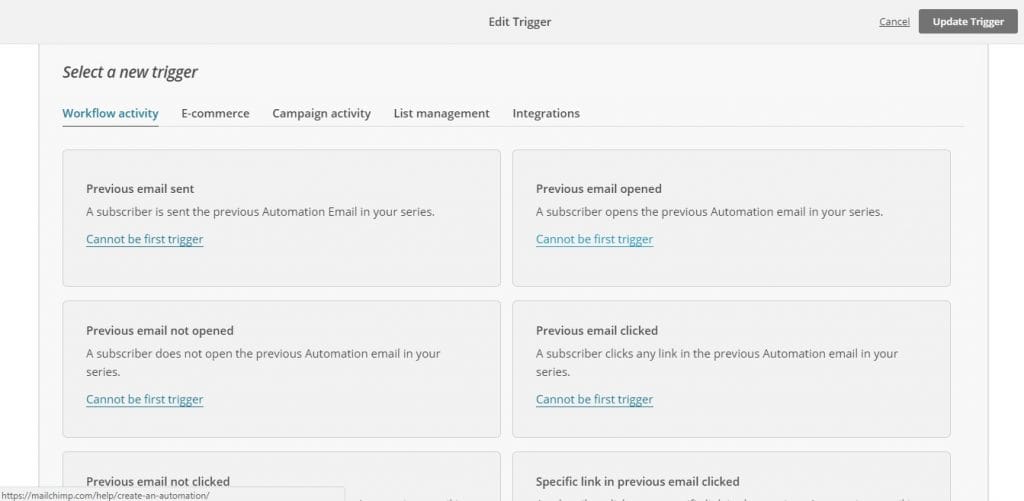
(Heads up: If this is the first email in the series, options to trigger after the previous email was sent, opened, or clicked won’t be available.)
An appropriate drip campaign might be:
Going beyond the sale, you can still use MailChimp to nurture new or existing customers. The conversation shouldn’t stop after you’ve made a sale.
So how can you continue to build the relationship?
For starters, you can:
The list can go on and on. But, the point is that you shouldn’t stop communicating with your customers after you’ve made a sale. Think about how you can creatively continue the relationship via MailChimp and its features such as automated emails.
By the way, Nutshell and MailChimp are a powerful combination. Learn more about how our MailChimp CRM integration helps get the right messages to your prospects at the right time, and start a 14-day free trial to see it for yourself!
While Mailchimp offers great features, sales teams should know its limitations. Pricing increases sharply as your list grows—even unsubscribed contacts count toward your limit. Automation features are basic compared to sales-focused tools, and it lacks advanced B2B functionality like lead scoring. Plus, the platform is clearly marketing-focused, so your “plain” sales emails may still look automated.
No, Mailchimp can’t replace a proper CRM like Nutshell. While Mailchimp handles email campaigns well, it lacks essential sales features like pipeline management, deal tracking, and activity logging. Think of Mailchimp as your email engine and your CRM as your sales command center—they work best together, not as replacements for each other.
Yes, but you must follow strict guidelines. Mailchimp enforces CAN-SPAM compliance by requiring unsubscribe links, physical addresses, and accurate sender information in every email. However, cold outreach to purchased lists violates Mailchimp’s terms—you need explicit permission from contacts. For true cold sales outreach, you’ll need different tools designed for that purpose.
Email marketing typically delivers $36 for every $1 spent, but sales-specific ROI depends on your implementation. Track metrics like email-to-meeting conversion rates (aim for 2-5%), deal velocity improvements, and cost per qualified lead. Most B2B teams see positive ROI within 3-6 months when combining Mailchimp with proper CRM tracking.
Mailchimp starts free for up to 500 contacts, then jumps to $13/month for the Essentials plan. Costs escalate quickly—expect to pay $75-150/month for 5,000-10,000 contacts. Every contact counts against your limit, including unsubscribes. For growing teams, consider that dedicated sales tools might offer better value as you scale.
Follow this step-by-step outbound campaign template to get on your contacts’ radars before you start dialing.

Join 30,000+ other sales and marketing professionals. Subscribe to our Sell to Win newsletter!